11 funboost 使用某些中间件或三方任务队列框架作为broker的例子(包括celery框架)。
第4章列举了所有funboost用法和场景,第11章补充一些小众中间件的用法
下面的项目中,演示funboost自动化操作celery复杂不规则项目目录时候怎么完虐用户亲自使用celery https://github.com/ydf0509/funboost_support_celery_demo
11.1 使用celery作为funboost的中间件
害怕celery框架用法pythoner的福音。用户无需接触celery的任务路由配置和celery对象实例,就可以自动使用celery框架来调度函数。
使用celery作为中间件,用户需要在 funboost_config.py  配置
CELERY_BROKER_URL(必须) 和 CELERY_RESULT_BACKEND (可以为None)

用户想使用celery作为funboost的消息队列,需要安装pip install celery,flower
11.1.1 funboost启动celery消费和定时和flower
test_celery_beat_consume.py
from celery.schedules import crontab
from datetime import timedelta
import time

from funboost import boost, BrokerEnum
from funboost.assist.celery_helper import CeleryHelper,celery_app


@boost('celery_beat_queue_7a2', broker_kind=BrokerEnum.CELERY, qps=5)
def f_beat(x, y):
    time.sleep(3)
    print(1111, x, y)
    return x + y


# celery_task_config 就是 celery app.task装饰器的原生入参,是任务函数配置。
# 如果要更新app的配置,例如使用 CeleryHelper.update_celery_app_conf({'result_expires':3600*48,'worker_concurrency':100})
@boost('celery_beat_queueb_8a2', broker_kind=BrokerEnum.CELERY, qps=1, broker_exclusive_config={'celery_task_config': {'default_retry_delay':60*5}})
def f_beat2(a, b):
    time.sleep(2)
    print(2222, a, b)
    return a - b


beat_schedule = {  # 这是100% 原汁原味的celery 定时任务配置方式
    'add-every-10-seconds_job': {
        'task': f_beat.queue_name,
        'schedule': timedelta(seconds=10),
        'args': (10000, 20000)
    },
    'celery_beat_queueb_8_jobxx': {
        'task': f_beat2.queue_name,
        'schedule': timedelta(seconds=20),
        # 'schedule': crontab(minute=30, hour=16),
        'kwargs': {'a': 20, 'b': 30}
    }

}

if __name__ == '__main__':
    CeleryHelper.start_flower(5556)  # 启动flower 网页,这个函数也可以单独的脚本中启动
    CeleryHelper.celery_start_beat(beat_schedule) # 配置和启动定时任务,这个函数也可以在单独的脚本中启动,但脚本中需要 先import 导入@boost装饰器函数所在的脚本,因为@boost时候consumer的custom_init中注册celery任务路由,之后才能使定时任务发送到正确的消息队列。
    print(CeleryHelper.celery_app.conf)
    CeleryHelper.show_celery_app_conf()
    CeleryHelper.update_celery_app_conf({'result_expires':3600*48}) # 如果要更新celery app的配置。
    f_beat.consume()  # 启动f_beat消费,这个是登记celery worker要启动消费的函数,真正的启动worker消费需要运行 realy_start_celery_worker,realy_start_celery_worker是一次性启动所有登记的需要运行的函数
    f_beat2.consume() # 启动f_beat2消费,这个是登记celery worker要启动消费的函数,真正的启动worker消费需要运行 realy_start_celery_worker,realy_start_celery_worker是一次性启动所有登记的需要运行的函数
    CeleryHelper.realy_start_celery_worker(worker_name='test_worker啊')  # 这个是真正的启动celery worker 函数消费。
    print('batch_start_celery_consumers()  之后的代码不会被运行')
11.1.2 funboost发布任务到celery队列
test_funboost_celery_push.py
from test_celery_beat_consume import f_beat,f_beat2


for i in range(100):
    f_beat.push(i, i + 1)
    res2 = f_beat2.push(i, i * 2)
    print(type(res2),res2.get())  # celer 的 delay 获取结果的原生celery异步结果对象类型
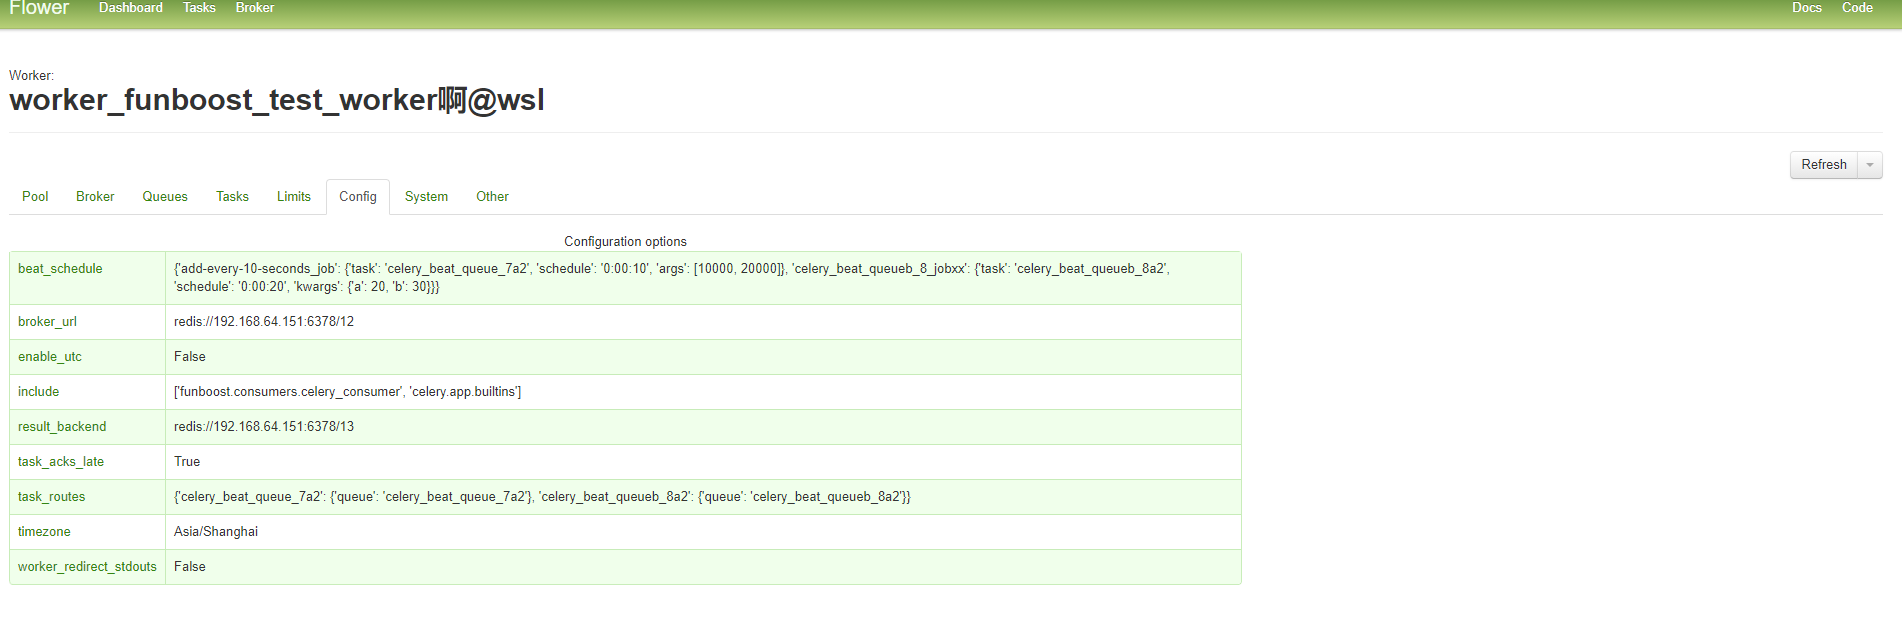
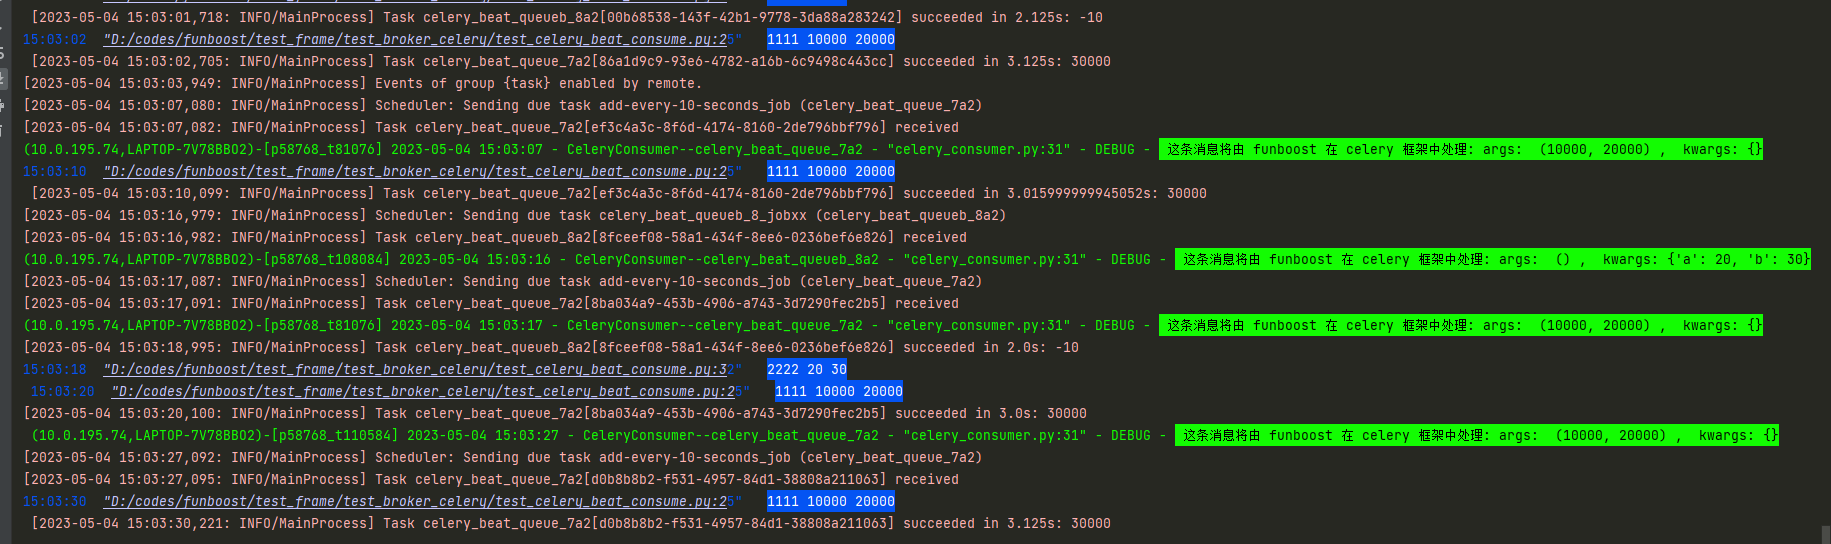
11.1.3 funboost使用celery作为中间件的运行截图
flower 截图
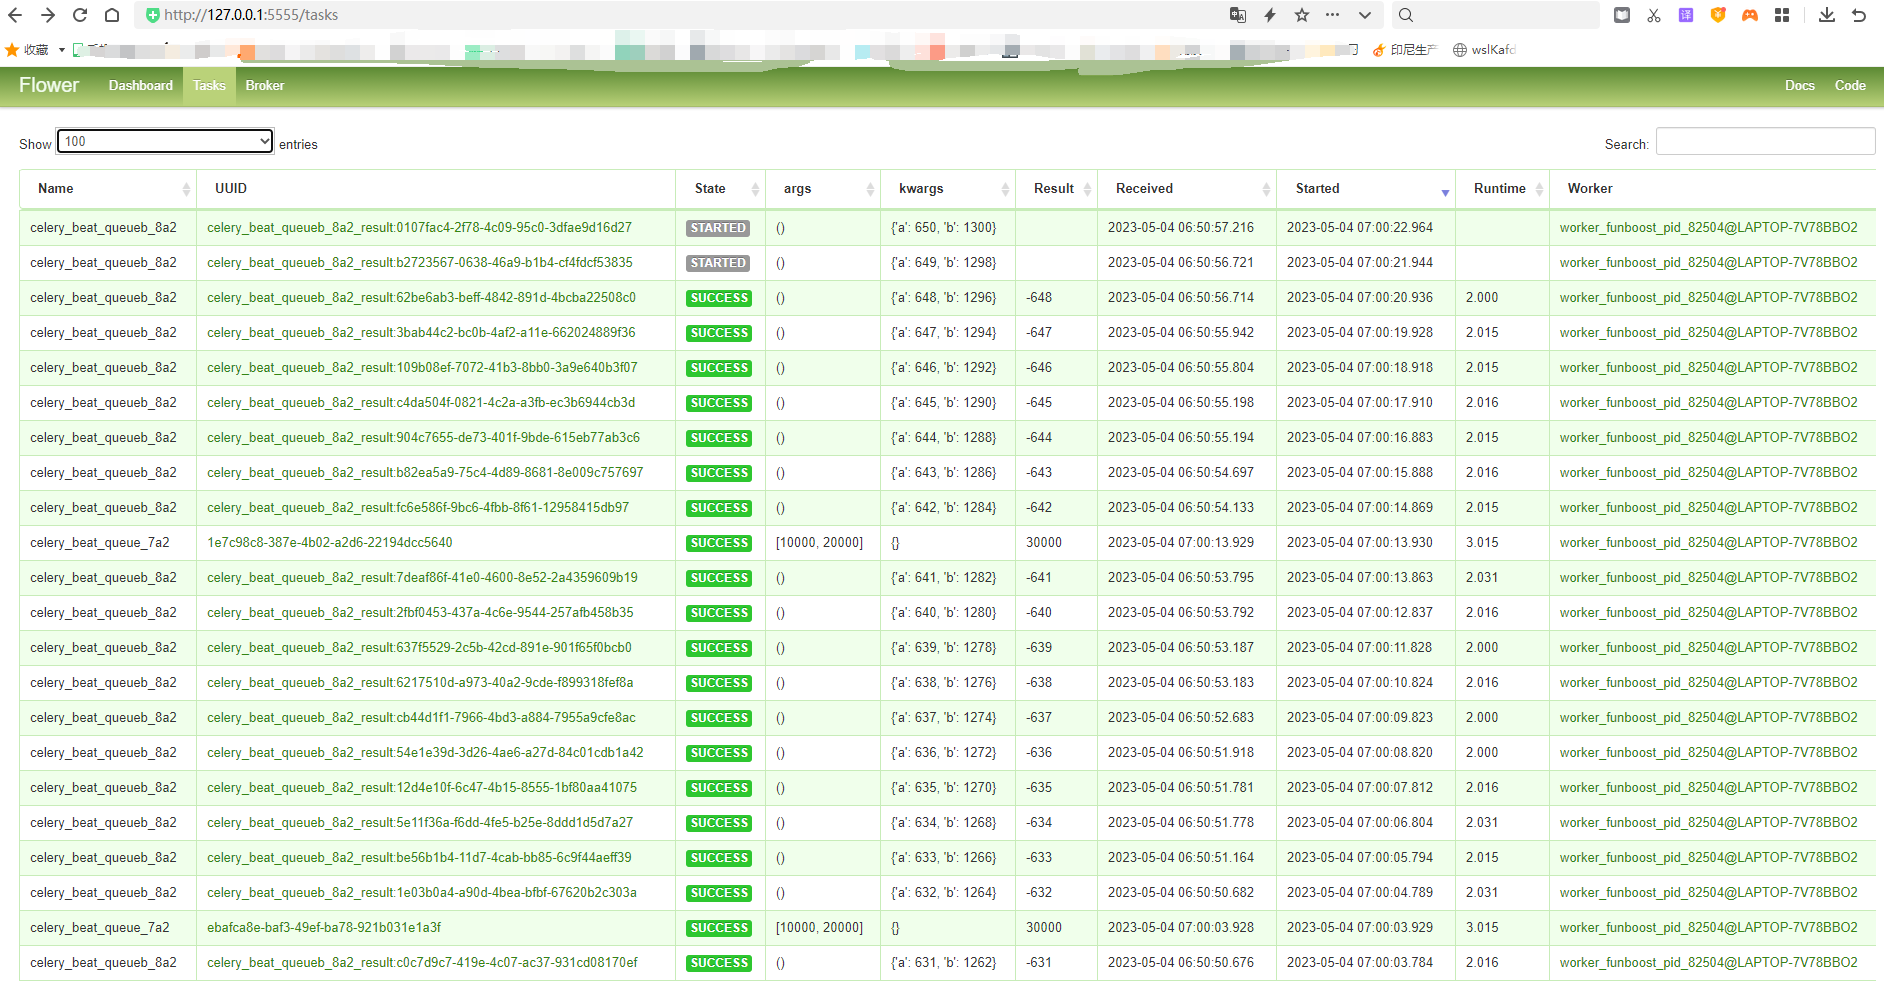
可以看到funboost的boost装饰器自动配置celery任务路由和任务配置。
funboost使用celery作为broker的控制台运行截图
11.1.4 funboost 的api 操作celery,比人工操作 celery 大大简化。
由此可知,用户无需操作celery本身,无需敲击celery难记的命令行启动消费、定时、flower;
用户无需小心翼翼纠结亲自使用celery时候怎么规划目录结构 文件夹命名 需要怎么在配置写include 写task_routes,
完全不存在需要固定的celery目录结构,不需要手动配置懵逼的任务路由,不需要配置每个函数怎么使用不同的队列名字,funboost自动搞定这些。

用户只需要使用简单的funboost语法就能操控celery框架了。funboost使用celery作为broker_kind,远远的暴击亲自使用无法ide下代码补全的celery框架的语法。
funboost通过支持celery作为broker_kind,使celer框架变成了funboost的一个子集
11.1.5 funboost 使用celery作为中间件时候,可以填写的celery任务配置
funboost的@boost装饰器的broker_exclusive_config的celery_task_config 可以配置项大全,就是@celery_app.task()的入参大全。 所有可以配置项可以看 D:\ProgramData\Miniconda3\Lib\site-packages\celery\app\task.py
'''
    #: Execution strategy used, or the qualified name of one.
    Strategy = 'celery.worker.strategy:default'

    #: Request class used, or the qualified name of one.
    Request = 'celery.worker.request:Request'

    #: The application instance associated with this task class.
    _app = None

    #: Name of the task.
    name = None

    #: Enable argument checking.
    #: You can set this to false if you don't want the signature to be
    #: checked when calling the task.
    #: Defaults to :attr:`app.strict_typing <@Celery.strict_typing>`.
    typing = None

    #: Maximum number of retries before giving up.  If set to :const:`None`,
    #: it will **never** stop retrying.
    max_retries = 3

    #: Default time in seconds before a retry of the task should be
    #: executed.  3 minutes by default.
    default_retry_delay = 3 * 60

    #: Rate limit for this task type.  Examples: :const:`None` (no rate
    #: limit), `'100/s'` (hundred tasks a second), `'100/m'` (hundred tasks
    #: a minute),`'100/h'` (hundred tasks an hour)
    rate_limit = None

    #: If enabled the worker won't store task state and return values
    #: for this task.  Defaults to the :setting:`task_ignore_result`
    #: setting.
    ignore_result = None

    #: If enabled the request will keep track of subtasks started by
    #: this task, and this information will be sent with the result
    #: (``result.children``).
    trail = True

    #: If enabled the worker will send monitoring events related to
    #: this task (but only if the worker is configured to send
    #: task related events).
    #: Note that this has no effect on the task-failure event case
    #: where a task is not registered (as it will have no task class
    #: to check this flag).
    send_events = True

    #: When enabled errors will be stored even if the task is otherwise
    #: configured to ignore results.
    store_errors_even_if_ignored = None

    #: The name of a serializer that are registered with
    #: :mod:`kombu.serialization.registry`.  Default is `'json'`.
    serializer = None

    #: Hard time limit.
    #: Defaults to the :setting:`task_time_limit` setting.
    time_limit = None

    #: Soft time limit.
    #: Defaults to the :setting:`task_soft_time_limit` setting.
    soft_time_limit = None

    #: The result store backend used for this task.
    backend = None

    #: If enabled the task will report its status as 'started' when the task
    #: is executed by a worker.  Disabled by default as the normal behavior
    #: is to not report that level of granularity.  Tasks are either pending,
    #: finished, or waiting to be retried.
    #:
    #: Having a 'started' status can be useful for when there are long
    #: running tasks and there's a need to report what task is currently
    #: running.
    #:
    #: The application default can be overridden using the
    #: :setting:`task_track_started` setting.
    track_started = None

    #: When enabled messages for this task will be acknowledged **after**
    #: the task has been executed, and not *just before* (the
    #: default behavior).
    #:
    #: Please note that this means the task may be executed twice if the
    #: worker crashes mid execution.
    #:
    #: The application default can be overridden with the
    #: :setting:`task_acks_late` setting.
    acks_late = None

    #: When enabled messages for this task will be acknowledged even if it
    #: fails or times out.
    #:
    #: Configuring this setting only applies to tasks that are
    #: acknowledged **after** they have been executed and only if
    #: :setting:`task_acks_late` is enabled.
    #:
    #: The application default can be overridden with the
    #: :setting:`task_acks_on_failure_or_timeout` setting.
    acks_on_failure_or_timeout = None

    #: Even if :attr:`acks_late` is enabled, the worker will
    #: acknowledge tasks when the worker process executing them abruptly
    #: exits or is signaled (e.g., :sig:`KILL`/:sig:`INT`, etc).
    #:
    #: Setting this to true allows the message to be re-queued instead,
    #: so that the task will execute again by the same worker, or another
    #: worker.
    #:
    #: Warning: Enabling this can cause message loops; make sure you know
    #: what you're doing.
    reject_on_worker_lost = None

    #: Tuple of expected exceptions.
    #:
    #: These are errors that are expected in normal operation
    #: and that shouldn't be regarded as a real error by the worker.
    #: Currently this means that the state will be updated to an error
    #: state, but the worker won't log the event as an error.
    throws = ()

    #: Default task expiry time.
    expires = None

    #: Default task priority.
    priority = None

    #: Max length of result representation used in logs and events.
    resultrepr_maxsize = 1024

    #: Task request stack, the current request will be the topmost.
    request_stack = None
'''
11.1.6 网上关于celery项目目录结构和文件夹/文件命名必须很死板, 是错的
网上说必须叫celery.py,还要固定的目录结构那都是假的,并不需要这样。
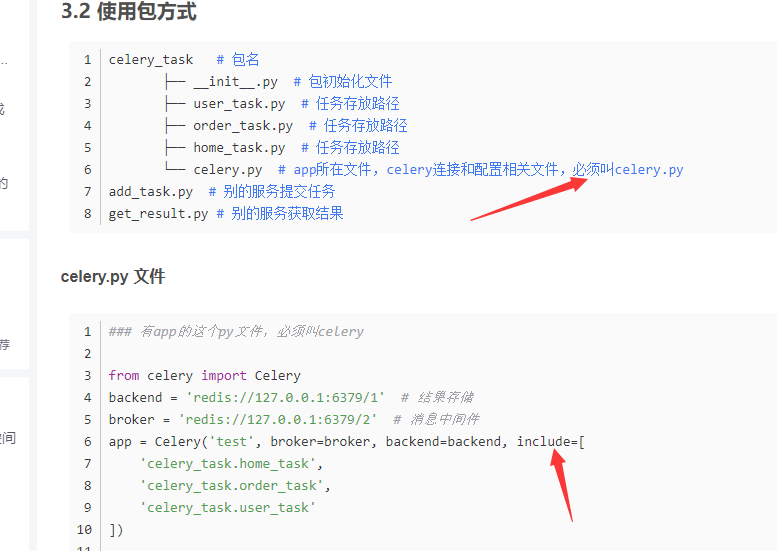
像这样的乱七八糟的celery目录结构是可以运行的。
https://github.com/ydf0509/celery_demo
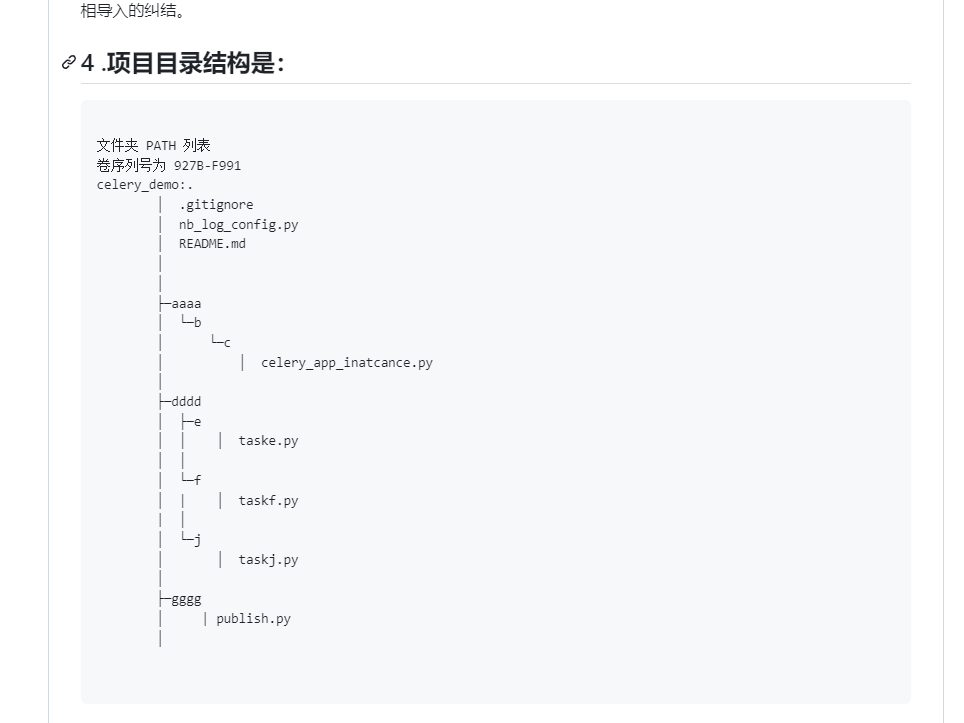
celery 实例化对象可以在项目的任意深层级文件夹的任意文件名字下,celery的@app.task函数也可以是在任何深层级文件夹的任意文件名字下。
如果用户不会怎么使用不同的队列名字,怎么在不规则的文件夹下使用celery框架,可以使用funboost + celery作为broker,funboost让用户远离celery本身,funboost内部可以自动化操作celery。
11.1.7 仍然想使用celery命令行?
有些人仍然想使用celery的命令行,操作一些其他命令,当然可以的
例如执行celery status命令
首先设置 PYTHONPATH为项目根目录,这个去看github pythonpathdemo项目,pythonpath说烂了,这作用都不知道的人别用python了。
linux 是 export PYTHONPATH=项目根目录
win 是 份powershell和cmd
   powershell 中设置临时会话环境变量 $env:PYTHONPATH="项目根目录"
   cmd        中设置临时会话环境变量 set PYTHONPATH="项目根目录"
cd {项目根目录}
python -m celery -A ./dir1/test_celery_beat_consume  status   # test_celery_beat_consume.py有 celery_app对象
因为 test_celery_beat_consume.py 模块中有 Celery类型的对象 celery_app,所以能够自动被celery命令识别到这个对象, 所以用户自己仍然想用celery命令行是可以的
11.1.8 funboost使用celery作为broker_kind的原理
与其说funboost支持各种消息队列中间件,不如说funboost实现了集成操作各种各样的消息队列的第三方python包,
@boost(queue_1, broker_kind=BrokerEnum.CELERY, qps=5)
def f_beat(x, y):

加了@boost后,那么funboost框架自动给celery_app 注册任务了,并且设置每个任务的消息使用不同的队列名存放,
@boost里面自动配置celery任务,并且支持用户用celery命令行按照11.1.7 操作celery,包括命令行清空队列 啥的都可以
11.2 使用nameko 微服务框架作为funboost消息中间件例子
11.2.1 nameko服务端脚本
test_funboost_nameko.py
from eventlet import monkey_patch

monkey_patch()

from funboost.consumers.nameko_consumer import start_batch_nameko_service_in_new_process,start_batch_nameko_service_in_new_thread


import time

from funboost import boost, ConcurrentModeEnum, BrokerEnum


@boost('test_nameko_queue', broker_kind=BrokerEnum.NAMEKO, concurrent_mode=ConcurrentModeEnum.EVENTLET)
def f(a, b):
    print(a, b)
    time.sleep(1)
    return 'hi'


@boost('test_nameko_queue2', broker_kind=BrokerEnum.NAMEKO, concurrent_mode=ConcurrentModeEnum.EVENTLET)
def f2(x, y):
    print(f'x: {x}   y:{y}')
    time.sleep(2)
    return 'heelo'


if __name__ == '__main__':
    # 用户可以使用nameko的 ServiceContainer ,直接启动每个nameko的service类,语法和funboost使用其他中间件语法一样。
    f.consume()
    f2.consume()

    # 也可以批量启动,使用nameko的 ServiceRunner 批量启动多个 nameko的service类。这个函数专门为nameko 中间件而写的。
    start_batch_nameko_service_in_new_thread([f, f2])
11.2.2 nameko客户端脚本
test_nameko_push.py
from test_funboost_nameko import f, f2

for i in range(100):
    print(f.push(i, b=i + 1))
    print(f2.push(x=i, y=i * 2))
11.2.3 funboost操作nameko能简化亲自使用nameko框架的语法
需要配置好rabbitmq的ip端口账号密码,因为nameko使用rabbitmq。
用户无需了解学习nameko框架的语法,就能使用nameko微服务框架。
11.3 使用kombu作为funboost的broker
kombu一次性能支持数十种消息队列,kombu是celery能支持多种消息队列的根本原因。celery依赖kombu从而实现支持多种消息队列。 kombu没有和celery深度绑定,kombu不依赖celery,是celery依赖kombu。所以kombu可以为funboost所用。
如果不用funboost celery等,
例如你想操作rabbitmq和redis作为消息队列,如果你使用kombu包,则一份代码就可以简单通过不同的中间件url连接切换来操作rabbitmq和redis了。
如果你不使用kombu,分别import pika和import redis来实现操作rabbitmq和redis,要写两份很大区别的代码。
使用kombu一次性能支持切换十几种消息队列比import 十几种python包来操作各种消息队列中间件香多了。
kombu能支持的消息队列大全:
TRANSPORT_ALIASES = {
    'amqp': 'kombu.transport.pyamqp:Transport', # rabbitmq作为消息队列
    'amqps': 'kombu.transport.pyamqp:SSLTransport',
    'pyamqp': 'kombu.transport.pyamqp:Transport',
    'librabbitmq': 'kombu.transport.librabbitmq:Transport',
    'memory': 'kombu.transport.memory:Transport',
    'redis': 'kombu.transport.redis:Transport',
    'rediss': 'kombu.transport.redis:Transport',
    'SQS': 'kombu.transport.SQS:Transport',
    'sqs': 'kombu.transport.SQS:Transport',
    'mongodb': 'kombu.transport.mongodb:Transport',
    'zookeeper': 'kombu.transport.zookeeper:Transport',
    'sqlalchemy': 'kombu.transport.sqlalchemy:Transport',
    'sqla': 'kombu.transport.sqlalchemy:Transport',  # 数据库作为消息队列
    'SLMQ': 'kombu.transport.SLMQ.Transport',
    'slmq': 'kombu.transport.SLMQ.Transport',
    'filesystem': 'kombu.transport.filesystem:Transport',   # 文件作为消息队列
    'qpid': 'kombu.transport.qpid:Transport',
    'sentinel': 'kombu.transport.redis:SentinelTransport', # redis 哨兵集群作为消息队列
    'consul': 'kombu.transport.consul:Transport',
    'etcd': 'kombu.transport.etcd:Transport',
    'azurestoragequeues': 'kombu.transport.azurestoragequeues:Transport',
    'azureservicebus': 'kombu.transport.azureservicebus:Transport',
    'pyro': 'kombu.transport.pyro:Transport'
}
11.3.1 kombu操作rabbitmq作为funboost的消息队列
设置boost装饰器的 broker_kind=BrokerEnum.KOMBU
broker_exclusive_config 中可以设置 kombu_url,如果这里不传递kombu_url,则使用funboost_config.py的全局KOMBU_URL

transport_options是kombu的transport_options 。
       例如使用kombu使用redis作为中间件时候,可以设置 visibility_timeout 来决定消息取出多久没有ack,就自动重回队列。
       kombu的每个中间件能设置什么 transport_options 可以看 kombu的源码中的 transport_options 参数说明。

例如kombu redis的Transport Options 说明
D:\ProgramData\Miniconda3\envs\py311\Lib\site-packages\kombu\transport\redis.py

Transport Options
=================
* ``sep``
* ``ack_emulation``: (bool) If set to True transport will
  simulate Acknowledge of AMQP protocol.
* ``unacked_key``
* ``unacked_index_key``
* ``unacked_mutex_key``
* ``unacked_mutex_expire``
* ``visibility_timeout``
* ``unacked_restore_limit``
* ``fanout_prefix``
* ``fanout_patterns``
* ``global_keyprefix``: (str) The global key prefix to be prepended to all keys
  used by Kombu
* ``socket_timeout``
* ``socket_connect_timeout``
* ``socket_keepalive``
* ``socket_keepalive_options``
* ``queue_order_strategy``
* ``max_connections``
* ``health_check_interval``
* ``retry_on_timeout``
* ``priority_steps``
import time

from funboost import BrokerEnum, boost
from funboost.funboost_config_deafult import BrokerConnConfig

@boost('test_kombu2b', broker_kind=BrokerEnum.KOMBU, qps=0.1,
       broker_exclusive_config={
           'kombu_url': BrokerConnConfig.RABBITMQ_URL,
           'transport_options': {},
           'prefetch_count': 1000},)
def f1(x, y):
    print(f'start {x} {y} 。。。')
    time.sleep(60)
    print(f'{x} + {y} = {x + y}')
    print(f'over {x} {y}')


if __name__ == '__main__':
    # f1.push(3,4)
    for i in range(10000):
        f1.push(i, i*2)
    f1.consume()
11.3.2 kombu+redis作为消息队列
设置boost装饰器的 broker_kind=BrokerEnum.KOMBU
broker_exclusive_config 中可以设置 kombu_url,如果这里不传递kombu_url,则使用funboost_config.py的全局KOMBU_URL
import time

from funboost import BrokerEnum, boost


@boost('test_kombu2b', broker_kind=BrokerEnum.KOMBU, qps=0.1,
       broker_exclusive_config={
           'kombu_url': 'redis://192.168.64.151:6378/10',
           'transport_options': {
               'visibility_timeout': 600, 'ack_emulation': True  # visibility_timeout 是指消息从redis blpop后多久没确认消费就当做消费者挂了无法确认消费,unack的消息自动重回正常工作队列
           },
           'prefetch_count': 1000},log_level=20)
def f1(x, y):
    print(f'start {x} {y} 。。。')
    time.sleep(60)
    print(f'{x} + {y} = {x + y}')
    print(f'over {x} {y}')


if __name__ == '__main__':
    # f1.push(3,4)
    for i in range(10000):
        f1.push(i, i*2)
    f1.consume()
11.3.2.b kombu + redis哨兵作为消息队列
装饰器 broker_kind=BrokerEnum.KOMBU
funboost_config.py 配置例子如下: KOMBU_URL= 'redis+sentinel://sentinel1.example.com:26379,sentinel2.example.com:26379,sentinel3.example.com:26379/0?sentinel=master01'
KOMBU_URL的格式规范就是celery的 broker_url 的格式规范,怎么写可以自己百度"celery redis 哨兵"就好了,因为celery就是依赖kombu包实现的支持多种消息队列.
BrokerEnum.KOMBU 和 BrokerEnum.CELERY 中间件都能支持redis哨兵模式.
只需要你配置 funboost_config.py 中的配置就好了,funboost 支持30多种消息队列或包或者框架,
funboost通过支持BrokerEnum.KOMBU 和 BrokerEnum.CELERY ,只会比celery支持的中间件模式更多,不会更少.
11.3.3 kombu+sqlalchemy 作为消息队列
import time
from funboost import BrokerEnum, boost,BrokerConnConfig

'''
默认自动创建表 kombu_message 和 kombu_queue, sqlalchemy版本要选对,测试 1.4.8 可以,2.0.15版本报错。
所有队列的消息在一个表中kombu_message,queue_id做区分是何种队列。
'''
@boost('test_kombu_sqlalchemy_queue2', broker_kind=BrokerEnum.KOMBU, qps=0.1,
       broker_exclusive_config={
           'kombu_url': f'sqla+mysql+pymysql://{BrokerConnConfig.MYSQL_USER}:{BrokerConnConfig.MYSQL_PASSWORD}'
                        f'@{BrokerConnConfig.MYSQL_HOST}:{BrokerConnConfig.MYSQL_PORT}/{BrokerConnConfig.MYSQL_DATABASE}',
           'transport_options': {},
           'prefetch_count': 500})
def f2(x, y):
    print(f'start {x} {y} 。。。')
    time.sleep(60)
    print(f'{x} + {y} = {x + y}')
    print(f'over {x} {y}')


@boost('test_kombu_sqlalchemy_queue3', broker_kind=BrokerEnum.KOMBU, qps=0.1,
       broker_exclusive_config={
           'kombu_url': f'sqla+mysql+pymysql://{BrokerConnConfig.MYSQL_USER}:{BrokerConnConfig.MYSQL_PASSWORD}'
                        f'@{BrokerConnConfig.MYSQL_HOST}:{BrokerConnConfig.MYSQL_PORT}/{BrokerConnConfig.MYSQL_DATABASE}',
           'transport_options': {},
           'prefetch_count': 500})
def f3(x, y):
    print(f'start {x} {y} 。。。')
    time.sleep(60)
    print(f'{x} + {y} = {x + y}')
    print(f'over {x} {y}')


if __name__ == '__main__':
    for i in range(100):
        f2.push(i, i + 1)
        f3.push(i,i*2)
    f2.consume()
    f3.consume()
11.3.4 kombu+mongo作为消息队列
import time

from funboost import BrokerEnum, boost

queue_name = 'test_kombu_mongo4'


@boost(queue_name, broker_kind=BrokerEnum.KOMBU, qps=0.1,
       broker_exclusive_config={
           'kombu_url': 'mongodb://root:123456@192.168.64.151:27017/my_db?authSource=admin',
           'transport_options': {
               'default_database': 'my_db',
               'messages_collection': queue_name,

           },
           'prefetch_count': 10})
def f2(x, y):
    print(f'start {x} {y} 。。。')
    time.sleep(60)
    print(f'{x} + {y} = {x + y}')
    print(f'over {x} {y}')


if __name__ == '__main__':
    for i in range(100):
        f2.push(i, i + 1)
    f2.consume()
11.3.5 kombu+文件作为消息队列
kombu_url 写 filesystem://
data_folder是规定消息文件在什么文件夹,这里每个queue弄一个文件夹。
processed_folder 是指处理过的消息放在什么文件夹

可以看到kombu使用不同的消息队列,只需要改变kombu_url的连接,transport_options则是根据每个消息队列的特色传递哪些参数。
transport_options具体可以传递的值,点击kombu的各种中间件的源码文件,里面罗列的十分清楚。
import time

from funboost import BrokerEnum, boost


queue_name = 'test_kombu5'


@boost(queue_name, broker_kind=BrokerEnum.KOMBU, qps=0.1,
       broker_exclusive_config={
           'kombu_url': 'filesystem://',
           'transport_options': {
               'data_folder_in': f'/data/kombu_queue/{queue_name}',
               'data_folder_out': f'/data/kombu_queue/{queue_name}',
               'store_processed': True,
               'processed_folder': f'/data/kombu_processed/{queue_name}'
           },
           'prefetch_count': 10})
def f2(x, y):
    print(f'start {x} {y} 。。。')
    time.sleep(60)
    print(f'{x} + {y} = {x + y}')
    print(f'over {x} {y}')


if __name__ == '__main__':
    for i in range(100):
        f2.push(i, i + 1)
    f2.consume()
11.4 使用dramatiq框架作为funboost消息队列
dramatiq是作者觉得celery用得不爽有坑,开发的任务队列框架,基本用途和celery一样
funboost的统一api,但使用dramatiq作为核心调度,
用户无需操作dramatiq 命令行来启动消费。
dramatiq框架作用类似于celery,支持rabbitmq和redis两种消息队列
在funboost_config.py 设置 DRAMATIQ_URL 的值就可以了
例如 amqp://admin:372148@106.55.244.110:5672/
redis://:passwd@127.0.0.1:6379/15
import time

from funboost import boost, BrokerEnum

from funboost.assist.dramatiq_helper import DramatiqHelper


@boost('test_dramatiq_q1', broker_kind=BrokerEnum.DRAMATIQ, function_timeout=10)
def f1(x):
    time.sleep(1)
    print('f1', x)


@boost('test_dramatiq_q2', broker_kind=BrokerEnum.DRAMATIQ, function_timeout=3)
def f2(y):
    time.sleep(2)
    print('f2', y)


if __name__ == '__main__':
    f1.consume()  # 登记要启动消费的queue
    f2.consume()  # 登记要启动消费的queue
    for i in range(100):
        f1.push(i)
        f2.push(i * 2)
    DramatiqHelper.realy_start_dramatiq_worker()  # 真正启动dramatiq消费
11.5 使用huey框架作为funboost消息队列
funboost_config.py中 配置好 REDIS_URL 的值就可以了

使用huey框架作为funboost的调度核心,但用户只需要掌握funboost的api语法,用户无需敲击huey命令行来启动消费
import time

from funboost.assist.huey_helper import HueyHelper
from funboost import boost, BrokerEnum


@boost('test_huey_queue1', broker_kind=BrokerEnum.HUEY, broker_exclusive_config={'huey_task_kwargs': {}})
def f1(x, y):
    time.sleep(10)
    print(x, y)
    return 666


@boost('test_huey_queue2', broker_kind=BrokerEnum.HUEY)
def f2(a):
    time.sleep(7)
    print(a)


if __name__ == '__main__':
    for i in range(10):
        f1.push(i, i + 1)
        f2.push(i)
    HueyHelper.realy_start_huey_consume()
11.6 使用rq框架作为funboost的broker
funboost_config.py中 配置好 REDIS_URL 的值就可以了

使用rq框架作为funboost的调度核心,但用户只需要掌握funboost的api语法,用户无需敲击rq命令行来启动消费

开发了 WindowsWorker 类,使 rq框架支持在windows运行,因为windows不能fork多进程,原生rq框架只能在linux、mac下运行。
使用rq任务队列框架作为funboost broker的例子
import time

from funboost import boost, BrokerEnum

from funboost.assist.rq_helper import RqHelper


@boost('test_rq_queue1a', broker_kind=BrokerEnum.RQ)
def f(x, y):
    time.sleep(2)
    print(f'x:{x},y:{y}')


@boost('test_rq_queue2a', broker_kind=BrokerEnum.RQ)
def f2(a, b):
    time.sleep(3)
    print(f'a:{a},b:{b}')


if __name__ == '__main__':
    # RqHelper.add_nb_log_handler_to_rq()  # 使用nb_log日志handler来代替rq的
    for i in range(100):
        f.push(i, i * 2)
        f2.push(i, i * 10)
    f.consume()  # f.consume()是登记要启动的rq f函数的 queue名字,
    f2.consume()  # f2.consume()是登记要启动的rq f2函数的queue名字
    RqHelper.realy_start_rq_worker()  # realy_start_rq_worker 是真正启动rqworker,相当于命令行执行了 rqworker 命令。
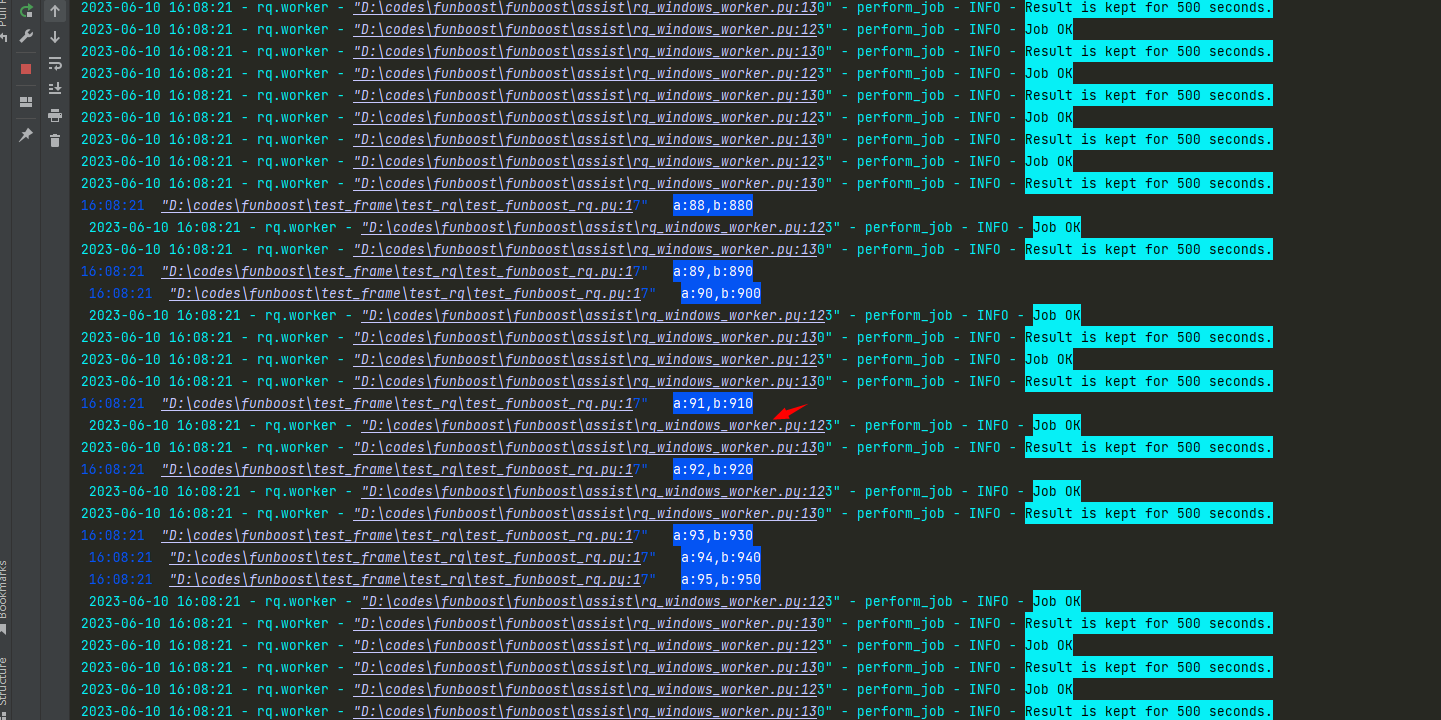
funboost使用rq作为运行核心的截图